The Proven Platter – Bolivia
Hello Diners!
We’re off to Bolivia this month, seems like we were just there, enjoying massive platters of Pique Macho! Well, I guess that was last year (September of 2016), but I’m happy to go back, because there were a few recipes that I didn’t get to try out the first time around.
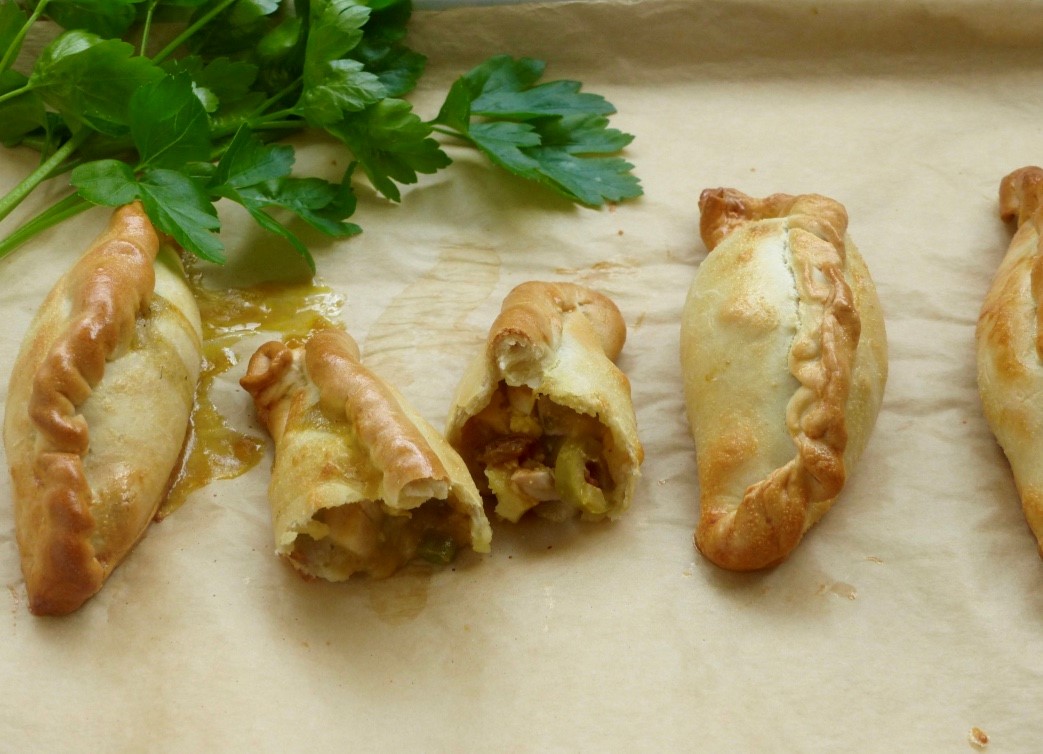
Salteñas, in particular, were on my must-try list. Bolivian salteñas are similar to Argentinean empanadas (turnovers), only juicier. They are filled with beef or chicken, hard-boiled eggs, vegetables and spices, and baked in the oven. The filling is uniquely thickened with gelatin instead of flour. As the salteña bakes, the gelatin melts, thereby creating a juicy filling. Take care with the first bite though, or you will have juices running down your arm!
The Bolivian salteña was supposedly created by Juana Manuela Gorriti. She was born in Salta, Argentina, and decided to sell juicy empanadas in order to survive when her exiled family was living in extreme poverty in Bolivia. According to Wikipedia, her empanadas soon became very popular and were known as the “empanadas de la salteña,” or “the turnovers made by the lady from Salta.”
The method is a bit tricky, but I’ve made sure to set you up with some instructional YouTube videos to help you along your way.
I’ve also tested a really delicious traditional soup, Sopa de Mani, or Bolivian Peanut Soup. I used beef in the soup, but you could also use chicken or make it vegetarian. The original recipe calls for raw peanuts, but I used roasted peanuts instead, since I couldn’t locate any raw peanuts. I searched at three different stores with bulk nut departments, but to no avail. Maybe something is going on with the peanut crop? Whatever you use, I promise the soup will be delicious.
Please feel free to contact me at nw4@togetherwomenrise.org if you have any questions or comments.
Buen Provocho!
Bolivian Turnovers (Salteñas), Tested
Yield: about 16
The beauty of this recipe is that it can be completely made ahead of time, frozen, and then baked on the day you need them. But do note: the filling must be made one day ahead of time to allow for the gelatin to set. You can also make the dough one day ahead of time, and then just assemble and bake the next day. Make sure to pull the dough out of the refrigerator ahead of time so that it can warm up before you roll it out.
The one wild card in this recipe is whether you are able to find aji amarillo pepper paste or powder. I found the powder at Whole Foods, and the paste at my local specialty shop. But if you can’t locate any, just use a pinch of something else to add spice to the filling, such cayenne or red chiles.
When dicing the potatoes and chicken, pay attention to keep your dice on the small side. The dough will be easier to roll and fill with smaller pieces in the filling. I’ve also included links to very short videos showing how to roll and fill the salteñas. A video is worth a thousand words!
Ingredients (filling)
4 tbsp. butter
1 cup yellow onion, chopped
2 green onions, chopped
2 tbsp. aji amarillo pepper paste, or 2 tsp. ground aji amarillo chile powder
1 tsp. kosher salt
½ tsp. ground cumin
½ tsp. oregano
¼ tsp. black pepper
2½ cups chicken stock, divided
1 large potato, diced small, about 2 cups
1 packet of gelatin
1 lb. boneless, skinless chicken thighs, diced
1 tbsp. sugar
1 tsp. teaspoon vinegar
½ cup peas
1 tbsp. chopped parsley
Additional ingredients (to be added during the assembly process)
Sliced black or green olives
Chopped hard boiled egg (about 2)
Raisins
Directions
Melt the butter in a large pot, add the yellow onion, and sauté for a few minutes until softened. Add the green onion and sauté for one minute. Next add the pepper paste. Then add the salt, cumin, oregano, and pepper, cook for a few minutes. Add 2 cups of the chicken stock, bring to boil, add the potatoes and simmer, covered, for 10 minutes.
Pour the remaining ½ cup of chicken stock into a small bowl, sprinkle the gelatin packet over the stock and let it soften.
Add the chicken to the pot, and simmer until the chicken is done, about 5 more minutes. Add the sugar, vinegar, peas, and parsley. Taste and correct seasoning.
Stir in the softened gelatin and refrigerate overnight to set up.
Ingredients (dough)
4 cups flour
2 tbsp. sugar
½ tsp. salt
1 stick (1/2 cup) melted butter
2 eggs, divided
about 1 cup of warm water
Directions
Preheat oven to 400 degrees, line a cookie sheet with parchment paper or foil, and grease with non-stick spray.
In a food processor, mix together the flour, sugar and salt. Pour in the melted butter, one of the eggs, and about ¾ cup warm water. Process until the dough forms a ball, and if you need to add extra water, add just a little bit at a time. The dough should be slightly firm, not sticky. This can also be done in a mixer or by hand.
Let the dough rest on the counter (covered with a towel so it does not dry out) for about 10 minutes. After it rests, divide the dough into 2-ounce portions, or about 16 balls. Roll out each ball to about the size and thickness of a 5- to 6-inch corn tortilla.
At this point, you are ready to assemble the salteñas, adding the additional filling ingredients to each in the assembly process. Don’t skip this step, as these ingredients really add interest to the filling.
To see short videos on how to fill and form salteñas click on these links:
Method 1: https://www.youtube.com/watch?v=1-HByGUgySE
Method 2: https://www.youtube.com/watch?v=oDR_Lm7MmXE
You’re back! Now I have some tips for you. I showed you two methods. The first method formed and filled the salteñas flat on the counter, without lifting them up. They were also baked flat. The second method formed and filled the salteñas in hand. They were baked sitting upright, with the braid facing up.
I tried both methods and found that I used a hybrid. What worked for me was putting the filling in the dough circle while still on the countertop, but then instead of folding the dough while flat, I pulled the edges of the dough up (so that it was sitting upright like a little packet), and pressed the edges together that way. Then I laid the packet flat to crimp the edges together. I also found that I needed to slightly moisten the edges to crimp, as there was still a bit of flour that prevented the edges from sealing well. As I went along, my technique got better and better. You will just have to experiment and see what works best for you.
Once you have finished making all the packets and placed them on your prepared baking sheet (braided end up), crack the remaining egg into a small bowl and beat well with a fork. Using a pastry brush, generously coat each salteña with the egg wash. This will help give them a golden shine.
Now, turn the oven down to 375 degrees and bake until the salteñas are browned, about 25 minutes. Watch for excessive browning. If the tops get too dark, lay a piece of foil over them to prevent burning.
You can also store the assembled salteñas in the freezer until you are ready to bake them. Place the frozen salteñas on a parchment-lined baking sheet (don’t forget to brush with egg wash) and bake an extra five minutes.
Recipe adapted from: https://dulceandsalado.com/2013/01/03/saltenas/
Photo credit: Linda McElroy