Proven Platter: Semolina Cake
This month is all about small plates, a common style of dining in Jordan. It’s called mezze.
Hello Diners! This month our good works and deeds take us to the country of Jordan.
Let’s talk about Jordanian Mezze. By far the most dominant style of eating in Jordan, (and one that I think is the most interesting), mezze refers to the spread of small plates; consisting of salads, appetizers, fruits, raw and pickled vegetables, aided by dipping and scooping with bread, you can make a complete meal of these simple dishes.
This style of dining sounds perfectly suited to the way we often dine at our monthly meetings, and a potluck is a terrific way to bring the mezze spread to our tables. In addition to the recipes posted this month, take a look at Saveur Magazine and their extensive range of mezze recipes, should you desire a wider variety to choose from. Other items to round out a mezze spread that can be readily purchased would include olives, feta cheese, raw vegetables, hummus, eggplant dip, stuffed grape leaves, pickled vegetables, pita bread and labneh.
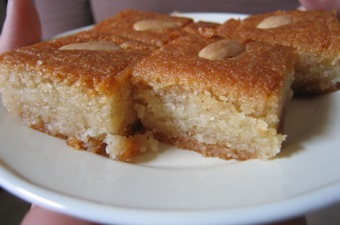
My pick for featured recipe this month is a Semolina Cake, a sweet snack cake usually served with tea or coffee. It goes by many names such as Harisa, Harissa, Basboosa, Nammoura or Revani depending on which country we’re talking about. It’s incredibly easy to make, no mixer required, light, and not too sweet. You won’t feel like you’ve indulged too much if you have a piece. Just completely satisfied.
This is a hands-on recipe. You’ll see what I mean. I’ve adapted this recipe from food.com, and others like it on the Internet to greatly reduce the sugar called for. So while it may not be tooth-achingly sweet, it is still plenty sweet.
The semolina called for in this recipe should be fairly easy to find in a well-stocked grocery store, Italian markets and bulk bins. But if you can’t find it, a ready substitute for semolina is farina, or more commonly known as the comforting breakfast cereal, Cream of Wheat! Just make sure you are not using the instant variety.
The recipe that I tested provided somewhat unusual instructions for mixing this batter with your bare hands. I tried it and it was fun! Indulge your inner child and follow directions exactly!
Ingredients
3 cups semolina (or Cream of Wheat)
¾ cup desiccated (unsweetened, shredded) coconut, optional
¾ cup unsalted butter, melted and cooled
¾ cup sugar
1 ½ tsp. baking soda
1 cup plain yogurt
Whole blanched almonds or pistachios, to garnish
Syrup
1 cup sugar
1 cup water
½ small lemon, juiced, or ½ tsp. orange or rose flower water
Directions
Preheat oven to 400 degrees.
Make sure you have all your ingredients measured beforehand. It’s hard to pull things out and measure with a messy hand.
Next make the sugar syrup. Bring the sugar and water to a boil on high heat. Then lower the heat and continue to simmer for five minutes, remove from heat and add your choice of flavoring.
Grease the pan with a light film of butter. With my bowl of melted butter sitting there at the ready it was efficient to just dip my fingers into it and grease the pan that way.
Mix the semolina, coconut (optional, but I used it and found it gave a very subtle taste), sugar and butter in a large bowl. Here’s the fun part: you get to use your hands to do this! You can make a well in the middle and pour the butter into the well. Then just start by tipping the semolina in from the edges of the bowl, eventually using your hands to incorporate everything. That way you won’t get super greasy hands. The mixture feels crumbly and quite pleasant in your hands.
In a separate bowl stir the yogurt and baking soda together, wait a few minutes until the yogurt doubles in size. When the yogurt has doubled (or almost) pour it on top of the semolina mix, and again, feel free to use your hands to mix.
Gently pat the batter down on a small jellyroll pan or a 9 x 13 baking dish. I used a small jellyroll (1/2 sheet pan) and it worked out perfectly. The cake mix should not be more than 1” thick. If it is, bake the cake in a bigger pan or take out the extra and bake it in a separate pan.
Now, using a butter knife, cut a diamond or square pattern in the cake. I cut mine into squares, 3 rows by 6 will give you 18 squares, or 4 rows by 6 for 24 squares. I know that diamonds are more traditional, but then you have all those odd corner pieces that don’t really add up to much. Press your choice of nut in each piece.
Bake for 30-35 minutes until it is a bronze color. Make sure to check after 30 minutes, mine was done at that point. Remove from the oven, and while it is still hot pour the syrup all over the cake. Although it is recommended to let the syrup cool and then drizzle over the cake I poured hot syrup over the hot cake and it may have been absorbed even better than cold syrup would have. Do use all the syrup – I found that the cake soaked it up immediately – and make sure to cover all the edges and corners adequately.
To serve you will have to re-cut along the lines again. This can easily be made one day ahead of time and stored in an airtight tin.
About the Author
Linda and her husband opened Ristorante Machiavelli in Seattle in 1988. After 25 years of cooking in and running a wildly successful neighborhood restaurant they sold the business and retired. Linda loves browsing through cookbooks, and the position of recipe curator provides her with a great excuse to indulge her passion. Linda hopes the dishes she tests and recommends will create a great experience for those who replicate her work in their kitchens.